Your Cart is Empty
FAST DISPATCH
FREE SHIPPING
FAST DISPATCH
FREE SHIPPING
FAST DISPATCH
FREE SHIPPING
Add description, images, menus and links to your mega menu
A column with no settings can be used as a spacer
Link to your collections, sales and even external links
Add up to five columns
Add description, images, menus and links to your mega menu
A column with no settings can be used as a spacer
Link to your collections, sales and even external links
Add up to five columns

Berry chia jam homemade yogurt
Barb Hodgens
Barb Hodgens loves to cook with alternative, healthy whole food ingredients, with a focus on gut health. Barb has overcome her own gut health issues through healthy eating. Share your ideas, comments and photos at the end of this post :)

Healthy jam cultured with yogurt.
Berry chia jam is the perfect, healthy, homemade jam alternative. With only 3 natural, whole-food ingredients it’s quick and easy to make. You’ll love the simplicity of chia jam because it literally takes only a few minutes on the stove, is packed with nutrition and can be made sugar free.
No pectin or extended simmering required; those little magic chia seeds do all the hard work of creating a jam-like texture. When added to liquid, chia seeds swell and become a gelatinous natural thickener ideal for instant jam. And bonus, most berries are plenty sweet enough, so you can skip refined sugar altogether. A tablespoon of honey (or maple) sufficiently cuts through any tartness and subtly sweetens the berries.

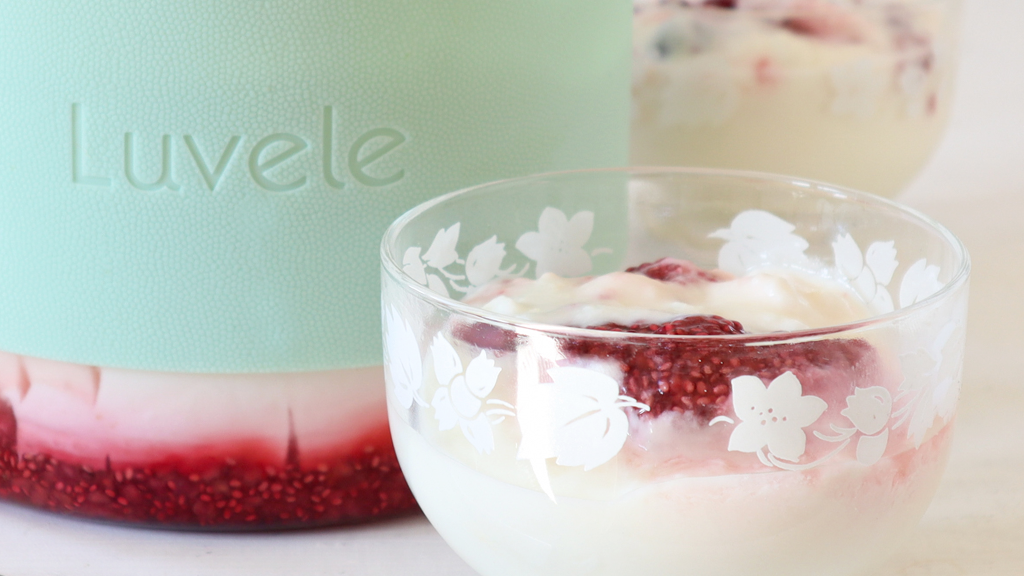
There is one thing better than chia jam, and that is cultured chia jam! Berry chia jam homemade yogurt is double the goodness for your gut as it’s packed with probiotics and fibre. Dig down and scoop out the berry jam at the bottom or swirl it through the yogurt after it has chilled. You’ll love the gelatinous seedy texture and burst of berry goodness in this homemade yogurt.

The Luvele Yogurt Maker puts you in control of the bacterial quality and the taste. Your starter culture will specify how long to incubate. Most will typically recommend 6-8 hours which will result in a mild tasting natural yogurt and suit this homemade berry chia jam yogurt recipe. For a therapeutic probiotic yogurt, you can ferment for longer, and up to 24-hours. The resulting yogurt and jam will taste tarter but have considerably more good bacteria.
Keep in mind the small amount of natural sweetener in the homemade berry chia jam will be used up by friendly bacteria during the culturing process, so the cultured jam may not taste as sweet as before it was fermented.

PREPARATION
Before you begin it is important to sterilise the Luvele yogurt making glass jar, lid, and any utensils you use, in hot water. Pouring boiling water over everything is sufficient. The danger of not sterilising is that other bacteria may overpower your starter culture and affect the quality of your yogurt.


Berry chia jam homemade yogurt
Luvele
Rated 5.0 stars by 4 users
There is one thing better than chia jam, and that is cultured chia jam! Berry chia jam homemade yogurt is double the goodness for your gut as it’s packed with probiotics and fibre.
Ingredients
- 1 cup mixed berries – frozen or fresh (I used frozen)
- 3 tablespoons of water
- 1 tablespoon of raw honey or maple syrup
- 2 tablespoons of chia seeds
- Yogurt starter culture
- Milk (quantity depends on the capacity of your yogurt maker)
Directions
CHIA JAM
- Place berries and water in a small saucepan.
Simmer on a low heat with the lid on for approx. 5 minutes or until berries start to fall apart.
Mash large berries with the back of a fork.
Remove from heat and add the chia seeds and honey/maple syrup and stir to combine.
Pour jam into your yogurt-making jar and allow to cool and set.
YOGURT
Measure Quantity of milk
Measure the appropriate quantity of milk to fill your Luvele yogurt maker and pour into a large, clean saucepan.
Heat and hold the milk at 82°C (180°F)
Use a thermometer. Note, as you become more confident with heating milk to make yogurt you will be able to judge when the milk is nearing 82°C (180°F) because it will begin to swell and rise in the pot (just before it simmers). Hold the heat at this temperature for anywhere between 2 - 10 minutes. The longer the better. Holding the milk at this high temperature allows the milk proteins to denature which thickens the yogurt. It can be a challenge to hold the milk at a high temperature for so long. Don’t get too caught up on the precise temperature. If the milk accidentally simmers briefly, don’t panic – reduce the heat and continue.
Cover the milk & let cool to below 42°C (107°F)
- It is fine if the milk cools down well below 42°C or even goes cold, it just mustn't be too hot. Temperatures above 43°C will kill the starter culture. Tip: You can actively cool it by filling a sink, or bowl with cold water and setting the pot of heated milk in the cold water.
- As the milk cools a layer of skin will form on the milk. There is no harm leaving it in. It does not produce lumpy yoghurt. If you are using unhomogenised milk, the skin will include the cream, which is rich and delicious. You don't want to miss out on this!
Add the starter culture and gently whisk it in.
Each yogurt starter culture will come with different instructions. Please follow the instructions unique to your starter culture and use the amount specified. Alternatively, stir in a quarter of a cup of homemade yogurt from a previous batch (per litre of milk).
Gently ladle the milk onto the set chia jam.
Take care with this step. Only add the milk when the chia jam is cold. The aim is to have two distinct layers.
Put the lid on the glass jar and place into your Luvele Yogurt Maker.
Pour water slowly into the base. The water must not be filled over the ‘tall line’ indicated on the inside wall of the maker. Place the cover lid on top. The milk is now ready to begin fermentation.
Set the time & temperature.
Use the digital control panel to set the temperature to 38° C (100° F), and the time to approx. 10 hours. (or up to 24-hours) Note only select more than 24-hours if you are using a unique blend of probiotic strains in your starter culture or when the method specifies 36-hours.
When the timer goes off, the fermentation is complete.
Condensation will have collected under the cover lid. Please take care removing it and allow the water to drip into the water bath, instead of your bench!
Switch the yogurt maker off and remove the yogurt jar.
Straight from the maker the yogurt will be runny and warm. Depending on the milk you used, there may be a layer of yellow cream on top of the yogurt. Be gentle with the warm yogurt and don’t stir it or else it won’t set in a perfect white mass.
Place the jar in the fridge for at least 6 hours to chill and set.
Recipe Video

PIN THIS RECIPE


Berry chia jam homemade yogurt

Healthy jam cultured with yogurt.
Berry chia jam is the perfect, healthy, homemade jam alternative. With only 3 natural, whole-food ingredients it’s quick and easy to make. You’ll love the simplicity of chia jam because it literally takes only a few minutes on the stove, is packed with nutrition and can be made sugar free.
No pectin or extended simmering required; those little magic chia seeds do all the hard work of creating a jam-like texture. When added to liquid, chia seeds swell and become a gelatinous natural thickener ideal for instant jam. And bonus, most berries are plenty sweet enough, so you can skip refined sugar altogether. A tablespoon of honey (or maple) sufficiently cuts through any tartness and subtly sweetens the berries.

There is one thing better than chia jam, and that is cultured chia jam! Berry chia jam homemade yogurt is double the goodness for your gut as it’s packed with probiotics and fibre. Dig down and scoop out the berry jam at the bottom or swirl it through the yogurt after it has chilled. You’ll love the gelatinous seedy texture and burst of berry goodness in this homemade yogurt.

The Luvele Yogurt Maker puts you in control of the bacterial quality and the taste. Your starter culture will specify how long to incubate. Most will typically recommend 6-8 hours which will result in a mild tasting natural yogurt and suit this homemade berry chia jam yogurt recipe. For a therapeutic probiotic yogurt, you can ferment for longer, and up to 24-hours. The resulting yogurt and jam will taste tarter but have considerably more good bacteria.
Keep in mind the small amount of natural sweetener in the homemade berry chia jam will be used up by friendly bacteria during the culturing process, so the cultured jam may not taste as sweet as before it was fermented.

PREPARATION
Before you begin it is important to sterilise the Luvele yogurt making glass jar, lid, and any utensils you use, in hot water. Pouring boiling water over everything is sufficient. The danger of not sterilising is that other bacteria may overpower your starter culture and affect the quality of your yogurt.


:recipekit:

PIN THIS RECIPE


Subscribe
Sign up to get the latest on sales, new releases and more …
